This release includes new features and improvements that make SOTO easier to use and more efficient.
SOTO's lights now indicate its operational status
SOTO's lights have been updated with new light signals that indicate its operational status. Dim red lights now indicate normal operation, while bright red flashes indicate an error. This makes it quick and easy to see the status of SOTO in live operation, even from a distance.
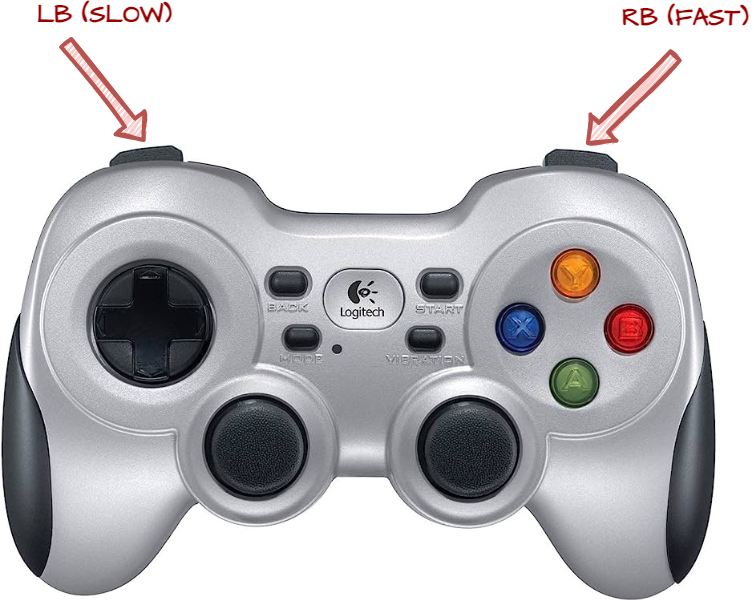
Logitech controller now supports speed control
You can now control the speed of SOTO with the Logitech controller.
Press the upper left button on the back of the controller for slow, precise movements.
Press the upper right button on the back of the controller to drive fast at up to 1.5 m/s.
These buttons are not toggled, so you need to keep them pressed while driving.
Manage your SOTO fleet with the new Magazino Fleet Management tool
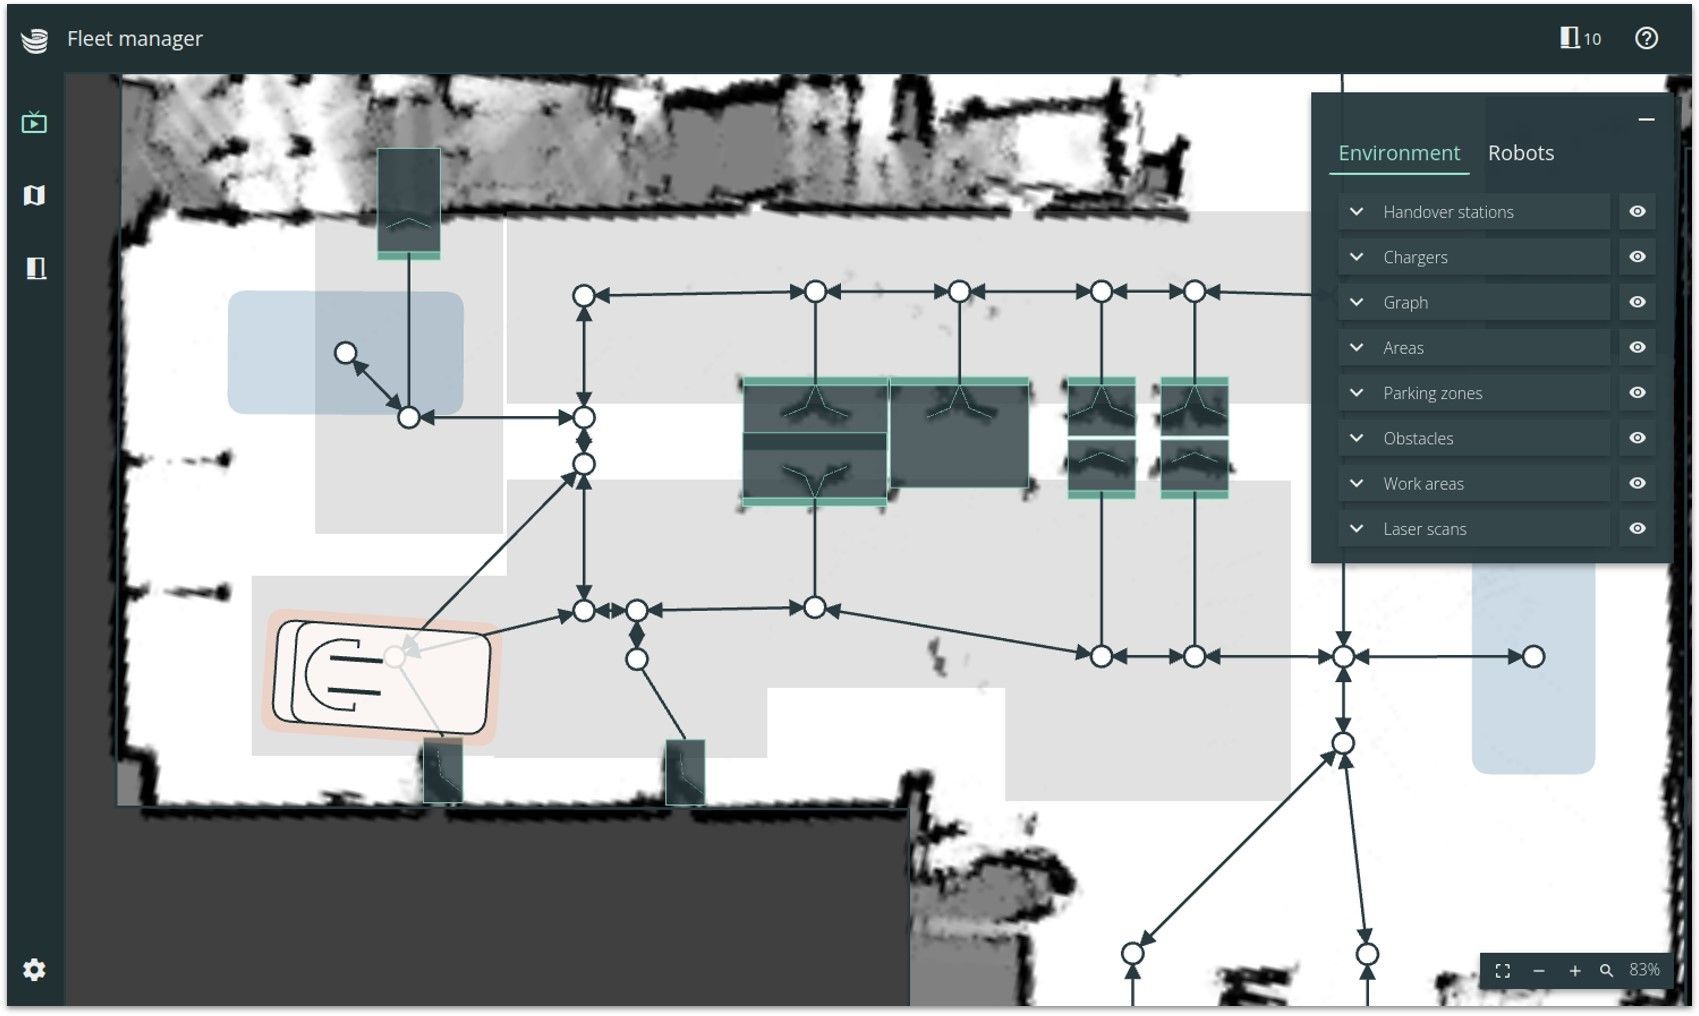
The Magazino Fleet Manager (MFM) is a cloud-based application that simplifies your robot fleet management. MFM includes the former standalone Environment Editor and Order Manager, which were previously available to customers.
Key features:
The Environment Editor lets you design and modify robot workspaces, outlining potential routes, handover stations, charging points, and more. You can easily adjust to evolving factory floor layouts.
The Live View tracks each robot's status and location in real time, giving you a comprehensive view of your fleet.
The Order Manager monitors the status of all orders in real time and lets you generate manual test orders.
The Fleet Overview provides insight into operational metrics, such as battery life and load carrier count.
Notifications keep you informed of error alerts, fire alarms, and map deployments, enhancing operational awareness.
MFM is designed to enhance your fleet's efficiency and ease of management. We look forward to receiving your feedback as you explore this new tool.
Live laser data visualization makes it easier to adjust shelves
The new live laser data visualization in the Environment Editor (EE) makes it quick and easy to adjust shelf positions.
Here's how it works:
In the EE, click on the laser icon to toggle the live laser data visualization.
Drive your SOTO close to the shelf you want to adjust.
Click on the Localization Map in the left menu to see the localization map.
Switch between the upper and lower laser scanners to detect the position of the docking shapes on the shelf, depending on where they are located.
Drag the shelf to the new position and press Save.
This eliminates the need to remap your entire space, saving time and simplifying the process.
Preview fences when you draw new nodes
You can now preview fences in real-time as you draw new nodes. This allows you to see how the fences would look after creation and make more accurate adjustments.
Edit multiple fences at the same time
You can now change the fence width for multiple nodes and edges at the same time. This makes it easier to make large-scale changes to your warehouse environment.
Fences are now highlighted for selected nodes and edges
The Environment Editor now highlights fences for selected nodes and edges in a different color. This makes it easier to see which fences are associated with a particular node or edge.
Map your environment directly from the SOTO Display
Mapping your environment is now much easier. You can map your space directly from the robot's screen, using the controller to navigate and view the map recording in real time. Once you're finished, the map is automatically uploaded to Magazino Fleet Manager for environment modelling.
This eliminates the need to carry around a laptop or connect to a separate computer. Just map your space from the robot itself, and you're good to go!
SOTO localization has been improved to reduce drift
SOTO's localization has been improved to reduce drift – a condition where the robot thinks it’s moving more than it actually is. This improvement makes SOTO more accurate, which means your warehouse operations will be smoother.
Technical Specifications
This section provides detailed information about the technical specifications of SOTO. This information is intended for technical experts who need to understand the inner workings of SOTO to deploy, troubleshoot, or improve the performance of SOTO.
SOTO’s navigation now supports partially constrained orders in VDA 5050
SOTO's navigation now includes support for partially constrained orders in compliance with VDA 5050, enhancing its multi-robot coordination and integration with specific master controllers.
Currently supported features:
Partially constrained orders (navigation)
Unconstrained navigation
Dense list of nodes (without position)
Dense list of nodes with position (no orientation)
Sparse list of nodes
Handle base/horizon, including waiting for a base release and optimizing a base for a known horizon
Currently unsupported features:
Fully constrained navigation (dense list of nodes with orientation on nodes and edges)
Limiting velocities on edges
Report current path in unconstrained mode
SOTO localization has been improved to reduce drift
The localization accuracy of SOTO has been significantly improved to reduce drift. This means that the robot's true location can be determined more accurately and reliably, even in complex environments.
The improvements to the localization algorithm include:
Cross-referencing positioning data with laser scanner data to more accurately determine the robot's true location.
Making the algorithm more robust to errors so that it is less likely to become delocalized.
This means that the robot can navigate more accurately, thereby improving the efficiency of warehouse operations.
Laser calibration can now be performed in Mag-CLI
The Mag-CLI tool now includes a new laser calibration functionality. This allows you to calibrate the robot's laser scanners to compensate for any deviations that may have occurred during transport.
The new laser calibration functionality includes the following features:
Single-command calibration
You can now calibrate the robot's laser scanners with a single command in Mag-CLI.
Command: magcli hardware calibrate laser-scanners
You still have to manually adjust the screws to position the laser scanner.
High-resolution rendering
The robot creates a new off-screen high-resolution rendering for remote inspection. You can download this rendering to your PC for comparison of before and after calibration images.
Independent rendering
The rendering can also be created independently of calibration. This can be useful for debugging or visualization purposes.
Command: magcli take-picture laser-scanners
Improved image capture for front-face tracking
The process of capturing images has been improved to ensure that they have the correct brightness levels for optimal depth data. This improvement significantly enhances front-face tracking.
For box tracking, views from the overhead camera and the gripper camera have been incorporated. This allows for accurate distance and angle measurements of the box, which are two crucial aspects for precise conveyor manipulation.
Gripper state now part of component states
The component state, gripper_occupied, has been added. This state can have three possible values: OCCUPIED, EMPTY, and UNSURE.
The gripper_occupied state is currently used for two purposes:
To check whether it is allowed to go to manual mode. This is only possible if the gripper is EMPTY.
To check whether the scene aggregator should aggregate what it sees or not.
Multiple new commands in Mag-CLI v3.0
Mag-CLI v3.0 has been released with multiple new commands. To see a list of all the commands, type the following command:
CODE
$ magcli commands list
In addition, Mag-CLI v3.0 also includes user-specific versions.
New commands
The following are some of the new commands that have been added in Mag-CLI v3.0:
job create charging [charger_name] - Creates a charging job for the specified charger.
job create navigation [compartment_name] - Creates a navigation job.
job retry - Job retry for problematic jobs.
job unassign [robot_name] - Unassigns a job from a robot.
job list - Lists all the active and pending jobs on a robot.
display videos [robot_name] [N] - Displays the last N manipulation videos for a robot.
take-picture [gripper-camera / laser-scanners] - Takes a picture using the gripper camera or laser scanners.
hardware readings [component] - Displays hardware readings with a graphical meter.
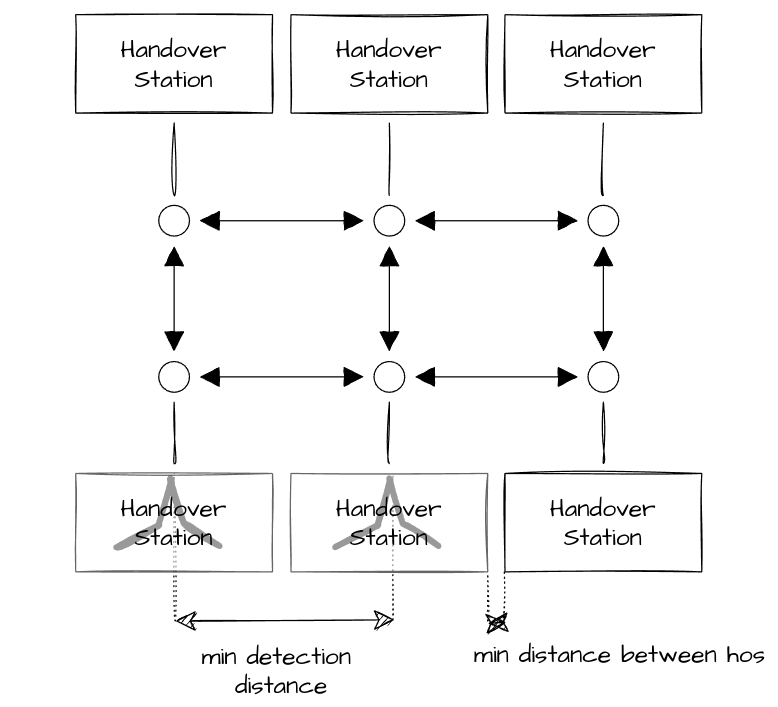
Direct connections between handover stations
Multiple handover stations can be located in a narrow space, creating a high density handover area. In these cases, it is possible to directly link the handover station nodes together with an edge. This can improve the robot's performance because it prevents the robot from having to navigate and turn on extra nodes.
However, it is important to consider the docking direction constraints of the handover stations when creating these direct links. If one handover station has a docking direction constraint, but not the others, the robot may have to execute a 180° turn. This can cause the robot to move outside the zone to find a place to turn.
Tips
If two handover stations are neighbors, connect them directly with an edge. Using a narrow fence on this edge will help the robot plan.
If two handover stations are facing each other, connect them directly with an edge.
Be aware of the minimum distance between handover stations. The handover stations have a minimum width, and clearance between their pillars and dock shapes. If they are too close, the robot will struggle to perceive them and distinguish them, leading to a loss of performance.
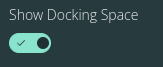
Prefer setting a similar docking direction for all handover stations that are neighbors. Note that for opposite handover stations, the docking direction reverses. For example, in the figure, the top handover stations can get docking direction RIGHT, then the lower one should get LEFT. You can use the “Show docking space” to help yourself (see screenshot below).
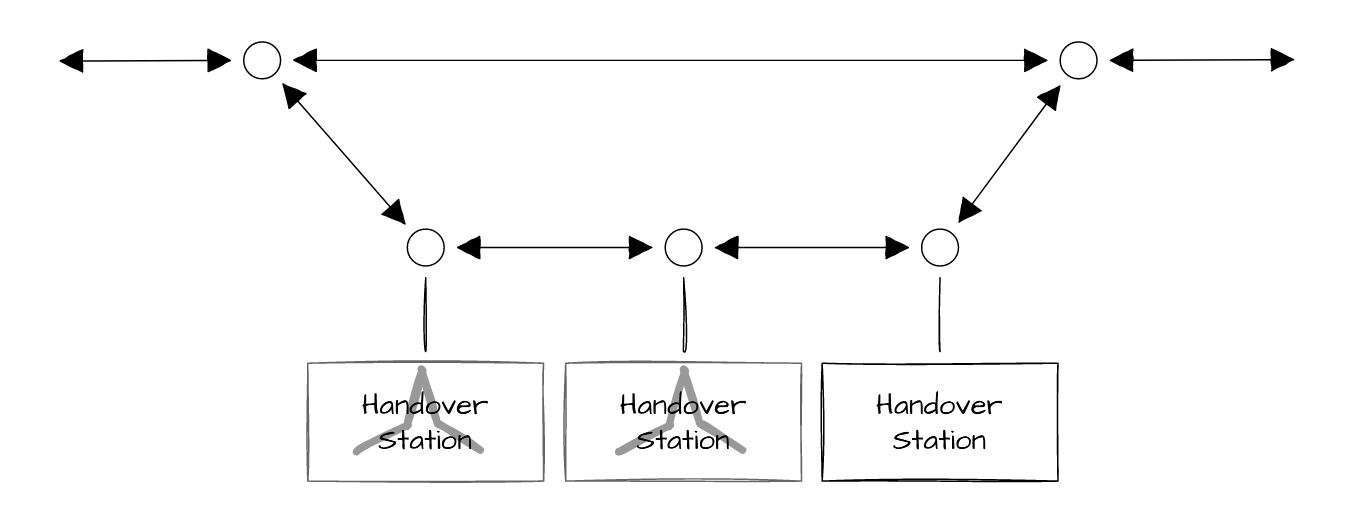
Driving through a high density area
The robot does not always need to dock at handover stations, but can simply pass through the area. In this case, it is better to add a parallel lane for the robot to drive through.
Improved collision avoidance with top laser scanner
Obstacles in the plane of the top laser scanner are now detected. For example, putting a box on top of the robot will generate a warning.
The Laser Field Monitor Obstacle State is set to "Blocked Front" when an obstacle is detected.
The allowed speed along the blocked directions is set to 0. The top_laser_retraction_state topic is published with the appropriate direction state.
No capabilities are cut.
Retracted laser scanner detection
The robot now detects when the laser scanner is retracted:
The Laser Field Monitor Obstacle State is set to "Retracted" when the laser scanner is retracted.
The speeds are not set to 0, so you can still manually drive the robot.
The top_laser_retraction_state topic is published with the retracted state.
The can_navigate and can_manipulate capabilities are cut.
Architecture of the Magazino Fleet Manager
Magazino Fleet Manager (MFM) is hosted in Google Kubernetes Engine (GKE), a Kubernetes service managed by Google Cloud. Kubernetes is an abstraction layer that makes it simple to manage containerized applications. This gives MFM the flexibility to support different project use cases, such as Full VDA5050 and proprietary middleware. Kubernetes also offers a standardized way to host applications, regardless of IT infrastructure or operating system versions. This means that customers can host MFM on-premises.
Kubernetes also allows Magazino to perform zero downtime upgrades and rollbacks. This means that MFM can be updated without disrupting the availability of the application. The entire management is carried out using the "Infrastructure as Code" principle.
Authentication
Users log in to MFM using Azure Active Directory accounts. Robots authenticate with client certificates.
JavaScript errors detected
Please note, these errors can depend on your browser setup.
If this problem persists, please contact our support.

.png?inst-v=f4298025-0332-4f6d-9973-f1558a9c6c26)
(1).png?inst-v=f4298025-0332-4f6d-9973-f1558a9c6c26)
(1).png?inst-v=f4298025-0332-4f6d-9973-f1558a9c6c26)
(1).png?inst-v=f4298025-0332-4f6d-9973-f1558a9c6c26)